
Tags
Back bacon, Bacon, Belly Pork, Curing, Home cured bacon, Home curing, Home smoked bacon, Home smoking, Nitrate free, Nitrate free bacon, Nitrite free, Pork, Pork loin, Rashers, River Cottage, Smoked bacon, Spice rub, Streaky bacon, Sweetcure bacon, Traditional bacon
Nothing beats the taste and quality of home-cured bacon.
Like most traditional and modern methods of preserving, home-curing and smoking bacon is a scientific process, where the ratio of cure to weight of pork, the number of days and procedure, in the case of smoking, the heat of the smoker and method used, together with the internal temperature of the meat, are crucial to its success.
For centuries, curing has been a way of preserving and flavouring foods such as meat, fish and vegetables by adding salt in order to draw out moisture from the food by the process of osmosis. A combination of salt with the addition of nitrite and/or nitrate, sugar, herbs and spices is often used for preservation, flavour and colour.
Curing one’s own bacon and other cuts offers the opportunity of avoiding the harmful nitrates and nitrites of industrially processed meats, which are often linked to a higher risk of colon or breast cancer especially in the case of red meats, even if you only enjoy them occasionally and in any case when the meat tastes so yummy can you really stop at one or two slices? Grazing on a late-night sandwich of cold meats topped with tangy dill pickles or a dollop of mustard or horseradish layered between a chunk of good bread can sometimes be impossible to resist when one feels a tad peckish. However, recent surveys have shown that commercially cured meats such as bacon or ham significantly increase the risk of cancer, while the World Health Organization includes bacon in the same category as asbestos, alcohol and arsenic which is actually quite scary.
Traditionally, nitrates and nitrates have been used to keep meat pink and avoid botulism, the bacteria of which are not harmful in themselves but the toxins they produce are highly poisonous and can be killed by cooking at a high temperature for a significant time. Most cases of food-poisoning are caused by storing food at the wrong temperature, being stored incorrectly or through bad practices in food processing plants, and the sure fire way of preventing botulism is by using synthetic cures like nitrates and nitrites such as saltpetre, which is potassium nitrate, or pink salts (for example, Prague Powder). Salt itself can be used as an alternative but one must make sure that the salt used is non-iodized such as pure sea salt, or else the meat will turn an unappetising shade of grey even though the cured meat should still be safe to eat. Even if commercially-produced bacon and ham are labelled ‘nitrite-free’ and instead contain vegetable extracts such as celery or beetroot powder, these convert to nitrites either in the preserving process or when they come into contact with the bacteria in your gut. It seems obvious, therefore, that the best and safest way to enjoy processed meats is to either source them at considerable expense from a wholly authentic, artisan supplier or else cure them yourself, which will yield a far greater quantity of product for a lot less money with the ethical choice of using the highest quality cut of meat you can afford.
Ever interested in the relationship between food and science and bored during the Lockdown, I decided to try my hand at dry-curing a 1.45kg piece of outdoor reared belly pork from the Chef & Butcher in Broadstairs, which the butcher skinned and boned out for me. The pork cost me £5.60 including the bones and the skin with its layer of fat and nothing was wasted; I put the bones in a plastic food-safe container in the freezer for stock or gravy at a later date and roasted the skin in the oven to make pork scratchings for my husband, Dan.
The first thing to do was to carefully wash and pat dry the pork and weigh it in order to calculate the amount of salt and sugar required for a safe, effective cure. The amount of curing salt should be between 3% and 5% of the net weight of the pork, and the cut weighed 1.160 kg which I rounded up to 1.2 kg for ease of calculation. I went for the safe option of 5% salt, therefore: 1.2 kg/100 = 12g x 5 = 60g.
The curing salt I used was Pure Vacuum Dried (PVD) Salt from Beech Tree via their Ebay store; they are a Cornwall-based supplier of a wide range of organic herbs and spices specifically aimed at cure mixes and cookery. For more information email info@beechtree.co.uk. PDV is created from salt which, after being carefully mined is evaporated in a brine in a vacuum. This process is highly efficient as the brine is boiled at a lower temperature than the usual 100°C and its purity and affordability in large quantities also benefits from finer granules than either sea salt or rock salt and under the microscope all the grains are cuboid, small and identical in size. This means that when they are applied to your meat they will create an evenness of cure because each salt particle dissolves and penetrates at the same rate. The particles also lock together, creating a good covering for methods of curing such as the salt-box method which is used for large joints of meat such as a leg of pork. Meanwhile, Kosher salt is a high-grade salt with large crystals and is usually additive-free. The salt is kosher because it draws away any residual blood from the meat, to comply with Kosher Law, and thus can also be used in natural curing methods.
The PVD I used contains an anti-caking agent – but neither Nitrates nor Nitrates – and it arrived in a carefully sealed and labelled bag with storage instructions. The PVD will keep well stored in a dry airtight container, away from direct sunlight. Another reason I chose PDV is because it is the curing salt used by Hugh Fearnley-Whittingstall’s River Cottage as outlined in River Cottage Handbook No. 13, Curing & Smoking by Steven Lamb; River Cottage are well-renowned for their ethical and eco-friendly standards of food production.
Any other ingredients included in the rub are at the discretion of the individual. Some people like to keep things simple and may add herbs and maybe some juniper or add nothing at all. Others, like myself, like to pimp it up and add a variety of herbs and spices. Dan enjoys a deep, smoky flavour so I added smoked paprika and Hungarian paprika to my blend as below:-
Curing Blend Recipe
- 5% nitrate-free curing salt
- 5% raw brown sugar
- 1 tsp freshly ground black peppercorns
- 1 tsp each rosemary and sage, chopped
- 1 tsp ground allspice berries
- 1 tsp smoked paprika
Alternatively you can add or substitute any of the following . . . 1 tsp ground juniper berries, and/or 1 tsp ground cloves, star anise, garlic powder, 1 tsp yellow mustard seeds, 1 tsp ground nutmeg and 1/8 tsp ground cinnamon, 1 tsp thyme.
Method
- Wash the belly pork and pat dry and place on a foil-lined tray.
- Grind the herbs and spices in a pestle and mortar
- In a medium bowl, combine all the ingredients – the herbs and spices and the curing salt and the sugar – until well-blended.
- Rub the spice mix over the pork belly, taking care to cover every bit of the surface on all sides.
- Place the pork belly in the refrigerator in a ziplock bag on a rack or baking sheet and rest for between 5 and 7 days. Every day the belly should be flipped onto the other side and the contents (which will change to a liquid) should be massaged around.
- Remove pork belly from the refrigerator and rinse thoroughly with cool water. Pat dry with paper towels and return to the refrigerator uncovered (on a rack over a pan to catch any drips) for 24 hours before smoking or slicing into strips.
If you wish to smoke your bacon before slicing, it may be done in a conventional domestic oven at 200oF (94oC) until it reaches an internal temperature of 150oF (66oC). This may take anything from 90 minutes to 4 or even 6 hours, depending on the size and weight of your meat (ours took nearly 2 hours) and do remember that oven temperatures may vary. You will need an instant-read thermometer, a roasting pan with a roasting rack that sits about 1.5 inches above the base of the pan, heavy duty aluminium foil and some wood chips. Hickory or maple wood chips will give you a traditional deep, smoky flavour but apple wood chips are perfect for a lighter, sweeter result and these were the ones my husband Dan and I used the first time we tried it.
Allow the belly pork to rest at room temperature for at least an hour and heat the oven to 200oF, removing all but one oven shelves. Line the base and sides of the pan crosswise with aluminium foil making sure that the excess foil extends over the long sides and a little up and over the short sides of the pan. Depending on the width of your foil you may need to use a few sheets, which should overlap in the centre of the pan by at least one inch. When these steps are completed, loosely scatter the wood chips over and place the rack over the chips. Put the pork belly on the rack skin side up and bring the long sides of the foil up to meet in the middle, then folding the down twice and crimping it to secure. Then bring up the short sides of the foil to meet at the top seam and crimp, ensuring that the whole of the rack and the belly are completely covered with foil. The crimping should be quite tight but should not touch the belly so that the smoke can circulate round it.
Put the pan on the stove top on a medium-high heat across two burners until smoke gently and steadily billows out of the top seam of the foil, which will probably take about 5 minutes, but it won’t be too powerful. When doing so I would recommend your leaving a door or window open or turning on the extractor fan above your stove.
Then place the pan on a shelf in the centre of the oven and cook until the internal temperature of the pork reaches 150oF on the thermometer. We checked the temperature after the first hour and based on the temperature reading, 30 minutes later and finally the was ready after 1 hour 50 minutes of smoking. It is important to secure (as before) the foil bundle after checking your meat and that you do not test it too frequently in order to ensure that the smoking temperature does not drop too low and to just let it do its thing. Therefore, if you have a larger piece of pork once an hour for the first two or three hours depending on its size. and then maybe at a further one hour and/or two half-hour intervals when the internal temperature of the pork is creeping closer towards the 150oF mark. As with many things, smoking requires you to draw on your instincts. It is perhaps wiser when home-smoking for the first time to try it out on smaller cut of belly pork, just in case your first attempt does not go to plan.
When the belly pork has reached an internal temperature of 150oF, remove it from the oven and carefully open the top seam of the foil to allow the meat to cool to room temperature. Then remove the skin with a sharp knife, cutting it away from you, and discard it. Wrap the bacon tightly in cling film or parchment and refrigerate it for at least 6 hours or overnight to allow the fat to firm up again, before slicing and cooking.
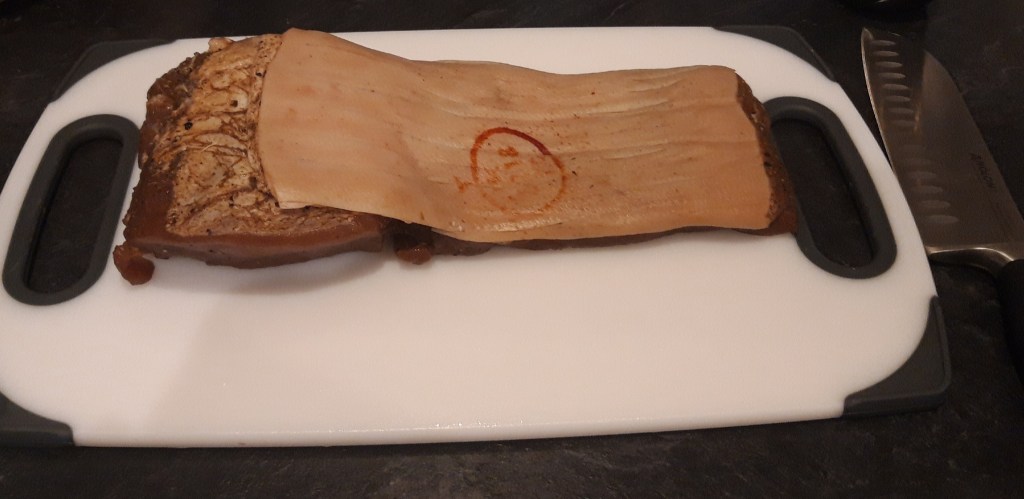
The smoked bacon should look like this; the skin or rind should cut off easily.
If you prefer to cook your belly pork in a smoker, a 1.5 kg piece of belly pork will often take up to 3 hours at 200oF or until the internal temperature of the pork reaches 150oF on the thermometer. If your smoker has a switch, set it to 200oF and soak 3 or 4 cups of wood chips in water for at least one hour before starting. Make 3 or 4 wood chip pouches. Cut out a 12” x 24” piece of heavy duty tin foil and place a cup of soaked wood chips on one end of the foil and add a handful of dry chips and fold foil over wooden chips. Fold all 4 edges of the foil towards the centre at least twice, poke holes on top of the pouch with a fork.
Lift the grill that’s above the lit element and place a pouch directly on the heat source. Close the lid and wait until smoke starts to escape from the foil pouch. Place the belly pork on the unlit side of the grill and close the lid. Smoke until the internal temperature reaches 150oF. Replace pouch every hour or so. Open the lid from time to time to let heat escape if the temperature is getting too warm. You may need to keep a close eye on it to maintain an even temperature so this method is not necessarily ideal if you need to go off and do something else for an hour or two. When the meat is ready, allow it to rest on a rack and baking sheet until it reaches room temperature and then wrap and refrigerate as in the conventional oven method.
Whether you choose to smoke your bacon in a conventional oven or over a smoker, after cooling and resting it may be stored for up to two weeks tightly wrapped in the refrigerator or, alternatively, sliced and wrapped in clingfilm and then foil (to prevent freezer burn) and transferred to a freezer for up to 3 months.
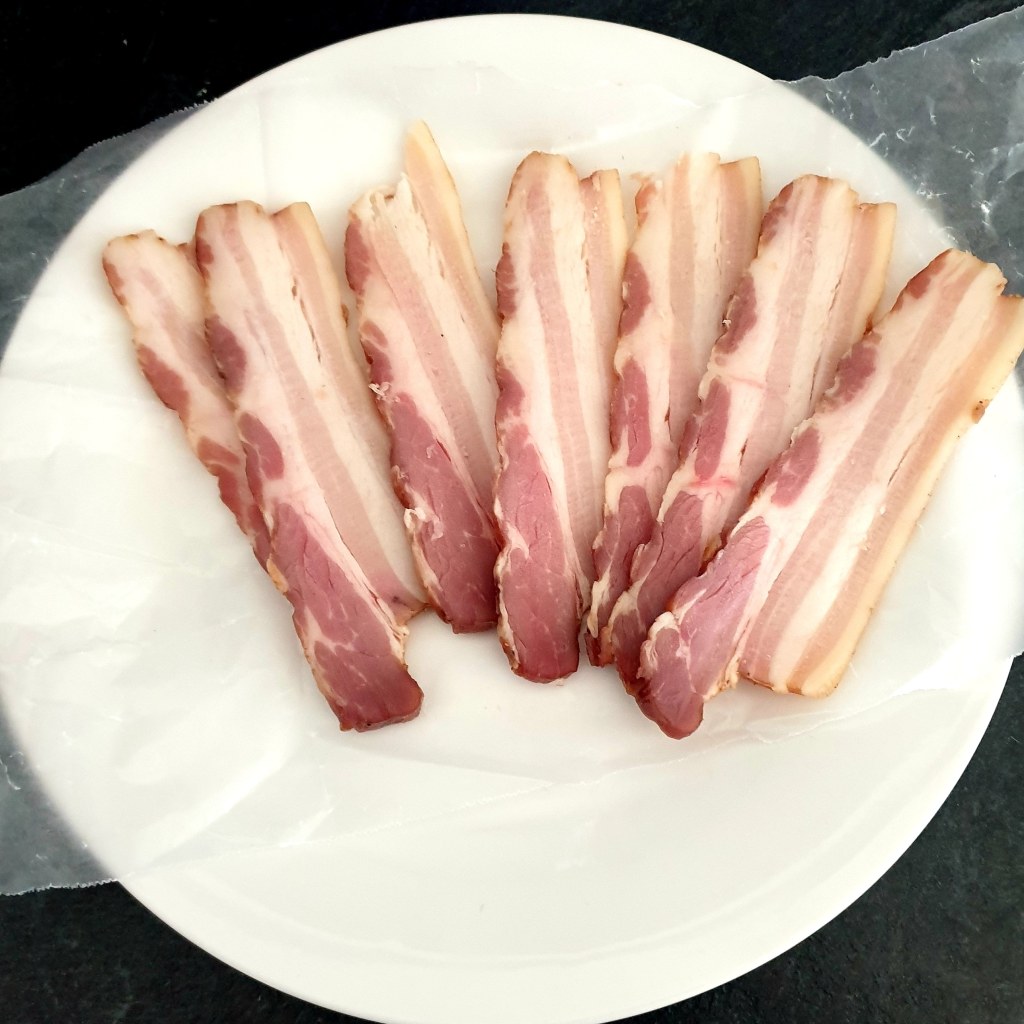
I have since tried curing a 1.1 kg piece of rolled pork loin for unsmoked back bacon, with equally successful results, but in this case I removed the butchers’ string before weighing the pork and prepping the dry cure. This is important to ensure that the cure can be effectively rubbed into the whole of the pork without missing any areas due to the presence of butchers’ string, so the pork can be cured fully and safely. I swapped paprika for crushed juniper berries and also added some fresh homegrown thyme to the cure, in addition to the other ingredients in my ‘go-to’ recipe.
The method is the the same as for streaky bacon, but instead of smoking the bacon after the curing and resting time, the loin can be cut into rashers on the long side of the meat before wrapping and storing in the refrigerator or freezer, as previously explained. Make sure that your knife is razor sharp so that it cuts through the meat cleanly like butter or, if you intend to cure your own bacon and charcuterie on a regular basis, you could invest in a meat slicer for around £65 on Ebay. or put it on your Christmas wish list!
Dan and I sliced and wrapped our bacon joints for both freezer and immediate use, and each time we had 5 or 6 packs of 6 flavourful rashers plus a 100g package of lardons to use in soups and stews. Dan took some to my brother, Robert, for he and his son Louie to enjoy, and over the following days and weeks I cooked with the rest.

A perfect plate of bacon, egg and crunchy fried homemade bread.
I will be curing another loin of belly or pork towards the end of November or early December in time for the festive season, and as I have also brined and cooked a joint of beef brisked for salt beef and will be curing some beef topside for braosola as well as a rolled pancetta, a meat slicer is definitely on my festive wish list!
Make a one-time donation
Make a monthly donation
Make a yearly donation
Choose an amount
Or enter a custom amount
Your contribution is appreciated.
Your contribution is appreciated.
Your contribution is appreciated.

Pingback: Home Cured Bacon blog - by a talented customer - Beechtree
Thank you so much. xxx