
Tags
Beef, Butchers Sundries Online, Charcuterie, Curing, Food, Haggis, Pork, Sausage-making, Sausages, Vegetables, Vegetarian haggis, Vegetarian sausages, Viscofan

Back in June, my husband Dan and I celebrated our 12th wedding anniversary in Lockdown with a day of sausage-making followed by a socially-distanced barbecue with our next-door-neighbours, Aidan and Sophia.
The art of sausage-making involves some scientific know-how and there is an obvious difference between making fresh sausages and those that you do not intend to eat right away.
Fresh sausage does not normally need curing salt, just a teaspoon of sea salt, freshly ground black pepper, whatever herbs, spices and other flavourings you like such as apple, sun-dried tomatoes or ale, breadcrumbs or oatmeal and the best quality meat you can afford. However, if you intend to experiment with curing some of the mixture or wish to store fresh raw sausages in the refrigerator for 2-3 days, then you will need to substitute curing salt for sea salt. You may also store your fresh sausages in the freezer well-wrapped for up to 3 months, but freeze them on the day you have made them and consume them within the time frame. Making your own sausages also gives you control over the quality of the other ingredients as shop-bought sausages often contain more unsavoury parts of the animal such as snout, gums, connective tissue and so forth.
If you want to keep your bangers in the refrigerator for 2-3 days before eating them or intend to have a go at producing air-dried sausage, such as chorizo, it is important to add a special curing salt, such as potassium nitrate or pink curing salt, to your sausage recipe in order to avoid botulism. The amount of curing salt varies according to which curing salt you choose and which type of sausage you are making but in the case of chorizo, for example, it is common practice to add 0.5g of potassium nitrate per kg of meat or 2.5g of pink curing salt per kg of meat, which is about half a teaspoon.
The method of curing also varies and is often very precise. Chorizo is often air dried by hanging up in an area with a steady temperature of between 50 and 60F and a humidity of 65-80F, but some people prefer to use an air dryer. Temperature and humidity are very important to avoid problems such as case hardening, which occurs when the cases cure faster than the meat inside. This usually happens when there is not enough humidity and the meat inside will not cure properly, although it is more of a problem with fatter sausages such as salami.
Occasionally mould will form on the sausage casing. White powdery mould is usually safe, but if it forms simply wipe it off with apple cider vinegar. If green mould forms on the outside of the casing do likewise, but if it is another colour such as blue or black you will need to throw the sausage away.
If the sausage does end up dryer on the outside than the inside, wrap in waxed paper or cling film and pop it in the refrigerator for a few days which will usually correct the problem, as the humidity left in the sausages will even out, leaving a more balanced sausage.
Air dried sausage is ready to eat when it has lost at least 35% of its original weight, so make sure you weigh the sausage before you hang it up to dry and then weigh it again before cutting, when it is firm to the touch by squeezing it.
If you are thinking about curing your own sausages in this way, making a small batch of fresh sausage (containing curing salt instead of sea salt and a variety of other seasonings) for eating right away and air drying one or two of the links to experiment, may be a step forward.
Dan and I chose to make fresh sausages by hand after grinding the ingredients in a food processor, as we did not have a sausage-maker or meat-grinder.

Because I wanted to make some vegetarian haggis sausages for myself, I bought one stick of Viscofan 30mm diameter 100% plant-based sausage skin from the Ebay UK seller butcherssundries_online, which cost me £8.99 including free p&p for one 15.24 metre stick. Viscofan are world-leaders in producing the finest quality sausage skins, using state-of-the-art technology to form their ingredients into casings. The casing I bought is 100% vegetarian, gluten-free, GMO-free, allergen-free and are also suitable for vegans. They are also marketed as having an excellent natural look with good frying qualities and a tender bite. The all-one-length stick is sectioned at approximately 2.5 cm intervals in folded form, which we found produced an average yield of 6 sausages and also allowed us to cut off the length of casing we needed without wasting any, knotting the cut-off end to secure before stuffing.
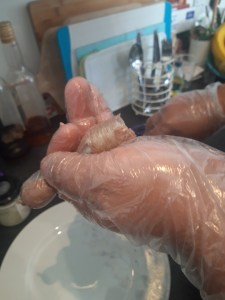
We started with the ingredients for the vegetarian haggis sausages, then the pork and tomato and finally the beef and red wine ones, washing the food processor thoroughly afterwards between each batch of ingredients to avoid cross-contamination. As we had no sausage-maker we first tried piping the mixture into the skin, which wasn’t very effective, but I had a brainwave and we inserted a small funnel into the open end of the casing and pushed the mixture through the funnel with clean fingers and the handle of a wooden spoon. We made sure the sausage casing was well-filled before twisting at each interval to form the individual sausage shapes, but this was the tricky part as the casing seemed less pliable than we expected so we needed to twist it several times to stay in place.
All the sausages cooked perfectly on the barbecue, the skins did not burst and had a tender bit. We set the grill higher over the coals to allow the sausages to cook evenly. There is nothing worse than a sausage burnt on the outside and still half-cooked on the inside. We wrapped the haggis sausages in foil and placed them in a foil tray with some water and steamed them over the barbecue. All the sausages had a good consistency and tasted delicious and we all enjoyed what we ate. I served all the sausages with a good vegetarian red wine reduction, a foil tray of onions gently fried and then placed over the barbecue covered with heavy-duty foil and some creamy mashed potato, and we shared a good bottle of Champagne.
Below are my sausage recipes – simply combine all ingredients in a food processor or meat grinder before making into sausages. I eyeballed most of the ingredients based on instinct, but if you’re not a confident cook then feel free to use your own weights and measures.
BEEF AND RED WINE SAUSAGES
- 500g minced beef – drizzled with a good glug of Merlot and allowed to marinate overnight
- A good handful of fresh breadcrumbs or oatmeal
- Fresh thyme, leaves only
- Sea salt and freshly ground black pepper
PORK AND TOMATO SAUSAGES
- 500g minced pork
- A good handful of fresh breadcrumbs or oatmeal
- 3 tbsp tomato paste
- Chopped sun-dried tomatoes if liked
- Fresh thyme and chopped sage, leaves only
- Sea salt and freshly ground black pepper
VEGETARIAN HAGGIS SAUSAGES
- Can butter beans, drained and mashed
- A good handful of oatmeal
- Chopped garden herbs, leaves only – thyme, rosemary, marjoram
- A good handful of vegetable suet
- A glug of sunflower oil
- 1 tsp ground allspice
- Sea salt and lots of freshly ground black pepper
We have since invested in a combined sausage-maker and meat-grinder and had a date making turkey and chorizo sausages seasoned with hot and smoked paprika, which turned out really well. We gave some to my brother and he loved them!
Make a one-time donation
Make a monthly donation
Make a yearly donation
Choose an amount
Or enter a custom amount
Your contribution is appreciated.
Your contribution is appreciated.
Your contribution is appreciated.

I like the idea of vegetarian sausage, but must ask, what is a glut? 🤭 is it related to a splash?
Lol! My bad, a typo, I probably meant glug – yes a generous splash! xx
Yes, it is a splash. Of course, I meant “glug” lol!