• About

Catherine Evans

~ Creative Artist and Food & Lifestyle Blogger

Catherine Evans

Tag Archives: traditional

MORNING ROLLS

06 Monday Jan 2025

Posted by catherineevans63 in Food and Drink

≈ Leave a comment

Tags

Baking, bread, breadrecipes, Food, Recipe, Scottishrecipes, traditional

Oven-fresh Morning Rolls on a cooling rack

Some years ago now, my mother, following one of her trips to Scotland (my parents were both of Scottish heritage) gifted me a Hale Pocket Guide “Traditional Scottish Cookery” by Margaret Fairlie which cost just 60 pence – this was in 1995.

This recipe for morning rolls is taken from that pocket book, which was first published way back in 1973. I have always enjoyed cooking up Scottish cuisine as it is part and parcel of my culture and bloodline. My father’s porridge was always the best (though my mum’s was a close second) and I taught my husband how to make it the traditional Scottish way, too.

Like my mother and her mother before me, I am very fond of baking and this Morning Roll recipe is so simple, made with only a few ingredients. If you cannot find fresh yeast then substitute with 12 g dried yeast or thereabouts – round up to 2 x 7 g sachets if you wish.

Very popular, particularly in Glasgow and Fife, Morning Rolls are well-fired, airy and chewy with a crispy crust. They are sold everywhere in petrol stations, bakeries, newsagents and corner shops and are best eaten on the day they are made before they go rock hard! In Fife, a Cabin Biscuit or Roll is a local variant. Originating in Buckhaven, a town on the Firth of Forth on the east coast of Fife, sugar was added to prolong the shelf life of the roll as they were often enjoyed by crews aboard fishing boats and have distinctive prick marks on top. However, the Morning Roll or Cabin Biscuit is a bread roll and not a biscuit in either the British or American sense.

Ingredients

  • 1 lb (450 g) plain flour
  • 1 level tsp salt
  • 2 oz (50 g) lard
  • 1 oz (25 g) fresh yeast (or up to 2 x 7 g sachets dried fast action yeast)
  • 1 tsp sugar
  • 1/2 pt (300 ml) milk

Method

Sift the flour into a warm bowl with the salt and then lightly rub in the lard until fully combined.

In a separate bowl, cream the yeast and sugar until liquid (or if using yeast sachets, just mix them together). Strain (or tip) into flour mixture and make into a soft dough with the milk.

Cover with a tea towel and leave in a warm place to rise. This will take about an hour.

Knead lightly, then form into 3 inch (7.5 cm) rounds. Brush lightly with milk taking care not to let the milk run down the sides of the rolls, and dust with flour – you can do this with the help of a sieve or even a tea strainer!

Place on a greased and floured tin and leave in a warm place for 15 minutes.

Bake in a moderately hot oven (400oF/ 200oC/Gas Mark 6) for 15 to 20 minutes.

Turn rolls out on to a wire rack and allow to cool before serving.

CHEF’S TIPS:

Morning rolls are also delicious served still slightly warm with lashings of butter.

A delicious accompaniment to a bowl of homemade soup or filled with smoked Ayrshire bacon, square sausage or perhaps some good cheese and pickle.

Suitable for home freezing. As soon as the rolls have cooled, wrap individually in cling film, place in a freezer bag and transfer to the freezer. They are so tasty though they may not get that far!

Bon appetit!

Catherine

Apple and Plum Traybake Cake

Featured

Posted by catherineevans63 in Food and Drink

≈ Leave a comment

Tags

Apple, Apple Cake, Autumn, Baking, Cake, Dessert, Fall, Food, Fruit Cake, Gluten-free, Plums, Pudding, Recipe, Spelt flour, traditional, Traybake, Traybake cake

This cake makes the most of autumn fruits and is so simple to make, and is delicious and versatile. I baked one for my birthday last month when Dan and I were renting a holiday cottage on a working farm in north-west Suffolk in the middle of nowhere. It is made with basic ingredients plus locally-grown fruit which for us was either abundant on the trees or bought cheaply from the gates of people’s houses (paid for by cash or coin into an “honesty box”) and the free-range eggs I used were only £1 per half dozen from a shelter outside our nearest public house 20 minutes’ walk down the road! You can substitute the fruit used in this recipe with any you have available, such as apricots or peaches, the zest of oranges, cherries, blueberries or blackberries.

Ingredients (makes 9 larger or 12 regular pieces)

175 g gluten-free self-raising flour, sifted

175 g soft brown sugar

175 g softened butter or sunflower margarine

1 tsp ground cinnamon

3 free-range eggs

2 local apples washed, peeled, cored and chopped

5-6 local plums washed and halved, stones removed

1. Preheat the oven to 170oC/150oC fan (340oF/ 300oF fan) or Gas Mark 4.

2. Grease a 20 cm traybake tin and line the base with greaseproof paper.

3. In a mixing bowl, cream the sugar and butter or margarine together until smooth and fluffy.

4. Add an egg and beat well into the mixture, then add some of the flour and fold in completely. Repeat this process until the flour and eggs are all combined.

5. Add the ground cinnamon and fold in.

6. Gently fold the apples into the mixture

7. Pour the mixture into the prepared tin and give it a gentle shake to even out.

8. Mark the mixture into 9 or 12 with a halved plum facing upwards. If you are allowing for 9 pieces put the remaining half plum in the centre for decoration.

9. Bake for about 35 minutes in the centre of the oven or until a skewer comes out clean. Oven temperatures vary so the cake may need a few minutes longer.

10. Remove from the oven and leave to cool in the tin for at least 10 minutes, then turn out carefully on to a wire rack to cool completely. Sprinkle with sifted icing sugar and cut into pieces and serve with a slice of mature (sharp) cheddar.

COOK’S NOTES

This recipe is also good made with spelt flour. Substitute the same quantity as for gluten-free self-raising flour and sift with 2 heaped tsp baking powder.

You may substitute the 1 tsp ground cinnamon with 1 tsp ground ginger or ground mixed spice.

If you prefer, serve the traybake cake warm as a pudding served with a dollop of creme fraiche or clotted cream. Remove the cake from the oven and cool in the tin for 15 minutes before slicing and serving.

One-Time
Monthly
Yearly

Make a one-time donation

Make a monthly donation

Make a yearly donation

Choose an amount

¤5.00
¤15.00
¤100.00
¤5.00
¤15.00
¤100.00
¤5.00
¤15.00
¤100.00

Or enter a custom amount

¤

Your contribution is appreciated.

Your contribution is appreciated.

Your contribution is appreciated.

DonateDonate monthlyDonate yearly

The Blind Chocolatier, Unit 6, Staveley Mill Yard, Back Lane, Staveley, Cumbria LA8 9LR

Featured

Posted by catherineevans63 in Food and Drink

≈ Leave a comment

Tags

Artisan, Artisan chocolate, Chocolate, Chocolate Gifts, Chocolate Shop, Chocolatier, Cocoa, Cumbria, Free From, Gifts, Gluten free, Handmade, Lake District, Recipe, Staveley, The Blind Chocolatier, traditional, Vegan, Vegetarian, Wedding Favours

So much to choose from and all Hann-made in the Lake District!

In June this year Dan and I visited my beloved Lake District for a few days and it was a welcome opportunity to see my step-mum Gil and my step-sister Annabel, as well do some sightseeing and to visit my father’s grave, for the first time since the Pandemic.

The weather during most of our trip was warm and sunny and on our last day in the area Dan and I chose to take an “AA Short Walk” around the boundary of Staveley’s Mill Yard and Craggy Woods, four miles in a two-hour stretch which was very pleasant especially along the pathways shaded by trees.

We returned to our starting point and after a sandwich lunch and coffee in a local cafe we decided to have a mooch around the Mill Yard as we had heard there was a chocolate shop there – and I am never one to pass up a chocolate opportunity!

The Blind Chocolatier is on the right-hand side inside the main entrance to Staveley Mill Yard and is a cute little shop with neat rows of delectable artisan chocolates and chocolate bars attractively and clearly displayed for easier choosing, although in practice choice may be something of a novelty when everything on offer appears scrumptious and irresistible.

Whilst deliberating, we chatted to the chocolatier himself to find out more about he and his craft. A pastry chef and member of a multiple-award winning team since 2007, in July 2015 local man Stuart was diagnosed with Leber’s Hereditary Optic Neuropathy (LHON), a rare eye condition characterised by loss of vision which is often the only symptom. LHON is a mitochondrial inherited (transferred from mother to child) degeneration of retinal ganglion cells and their axons that leads to an acute or subacute loss of central vision and typically affects young males. It is only transferred through the mother as it is primarily due to mutations in the mitochondrial, rather than nuclear, genome and only the egg contributes mitochondria to the embryo which means that men cannot pass the disease on to their offspring. Although registered legally blind, Stuart has not only continued to maintain his role in a 2 Rosette Standard kitchen but has finally achieved a long-held dream of having a chocolate shop in Staveley, where his business has flourished.

Stuart told us that Christmas trade last year was very successful and hoped that despite the Cost of Living Crisis those healthy sales would be repeated as he had just invested in new tempering equipment. I said that I am sure he will continue do well; after all, who doesn’t love chocolate?!

Dan and I eventually chose two chocolates each, including cherry and blackberry varieties which Stuart put in a little box to take out, although we assured him they wouldn’t last 5 minutes and of course they didn’t; we were barely outside the door before we got stuck in and they were scrumptious and flavourful with a smooth, velvety texture. I could have eaten two or three times the quantity without any help at all from Dan!

Heaven in a box!

The Blind Chocolatier has a page on both Facebook and Instagram, sometimes showcasing new flavours in production or activities going on behind the scenes such as new product development, sneak-peaks at Christmas confectionery or making a special batch of wedding favours, as well as a website at http://www.theblindchocolatier.co.uk with an online shop offering both delivery and collection services. Choose from a wide variety of tempting and beautifully-wrapped artisan chocolate bars for £3.20 each, including Dark Chocolate with Pistachio and Almond for ‘nutty’ moments, Vegan Oat Milk and Dark Chocolate and Ginger; or what about a 6 Selection Box of Chocolates for £6, a Milk or White Chocolate 12 box or a 12 box All Rounder for £11.50 each? Postage and packing costs £6 for delivery within 1-2 days so I ordered a box of the Chef’s Selection containing 25 chocolates for £23 to send straight to my stepmother for her birthday, along with a note, and she was thrilled to receive them especially as they were made locally. I shall certainly be ordering more in the future.

If you are planning a trip to the English Lake District, why not put Staveley Mill Yard on your ‘to visit’ list? The Blind Chocolatier and his neighbours look forward to welcoming you soon.

The Blind Chocolatier is open Monday – Saturday 10 am to 5pm and on Sunday 10 am – 4 pm.

Happy eating!

Catherine

One-Time
Monthly
Yearly

Make a one-time donation

Make a monthly donation

Make a yearly donation

Choose an amount

£3.00
£9.00
£60.00
£3.00
£9.00
£60.00
£3.00
£9.00
£60.00

Or enter a custom amount

£

Your contribution is appreciated.

Your contribution is appreciated.

Your contribution is appreciated.

DonateDonate monthlyDonate yearly

Gypsy Tart

07 Tuesday Jul 2020

Posted by catherineevans63 in Food and Drink

≈ 2 Comments

Tags

Condensed milk, East Kent, Evaporated milk, Gypsy tart, Gypsy tart recipe, Isle of Sheppey, Kent, Kentish recipe, Milk tart, Muscovado sugar, Recipe, traditional, Unrefined sugar

Gypsy Tart is a dessert from the Isle of Sheppey in East Kent, in the south-east of England. It comprises a shortcrust pastry base, with a whipped evaporated milk and dark muscovado sugar filling, baked in the oven.

Legend has it that a woman on the Isle of Sheppey took pity on some impoverished-looking gypsy children and invented a tart using whatever ingredients she could find in her home with which to feed them. Whether or not this tale is true, gypsy tart was always popular in school meals.

Although purists might make gypsy tart with regular evaporated milk, condensed milk may be used instead as it is simply evaporated milk that has been sweetened. Whether you prefer to use evaporated or condensed milk in your recipe, always chill the can in the refrigerator for at least 30 minutes before you need it, but preferably overnight.

This tart is very sweet and using condensed milk instead of evaporated milk will make it even sweeter with a darker colour, so I would recommend adding less sugar in the mixture. Light muscovado sugar can also be substituted for the molasses-rich dark variety and will also produce a lighter colour.

My version of this tart has a gluten-free pastry case. The flour blend I used already contained Xanthan gum, which acts as a stabilizer, but you will need to add a little extra to ensure the pastry holds together well. If you are not a coeliac or sensitive to gluten, then you may use regular plain flour.

I made a slightly sweet shortcrust pastry which I mixed in a food processor, but the pastry can also be made by the traditional rubbing-in method if you prefer. The pastry case should be baked blind before the filling is added. I brushed beaten egg on the pastry base for the last few minutes to seal it and prevent any leakage from the filling. The rest of the beaten egg can be used in another recipe but I added mine to the mixture and stirred it in thoroughly to combine.

It is crucial to whisk the evaporated milk or condensed milk with the sugar until it thickens sufficiently in order to ‘set’ during baking, otherwise even if it is cooked the filling will go everywhere – although it will still taste delicious either on its own or perhaps with a dollop of crème fraiche. I sprinkled a little cinnamon and nutmeg over the tart before popping it into the oven. The tart is ready once the filling has risen and the surface is tacky. Leave to cool before serving to allow the filling to set.

INGREDIENTS

For the pastry

  • 225g plain (all purpose) gluten-free flour, sifted – I used Dove’s Farm
  • 1 tsp Xanthan gum
  • Pinch of salt
  • 100g unsalted butter, diced
  • 50g icing sugar, sifted
  • 1 medium free-range whole egg, plus 1 beaten.

For the filling

  • 397g can condensed milk or 410g can evaporated milk
  • 250g dark muscovado sugar (300g if using evaporated milk)

First of all, make the pastry. Put the icing sugar and butter in a food processor, add one egg and whizz until combined. Then add the flour and xanthan gum and whizz again until the mixture just comes together. If the mixture still looks crumbly, add a teaspoon of cold water and pulse, repeating if necessary to avoid overworking the pastry.

Dust your clean work surface with flour, turn the dough out on to the work surface bringing it together with your hands and knead lightly, shaping the pastry into a ball or a flat disc. Wrap in cling film or greaseproof paper and chill in the refrigerator for 30 minutes to allow the dough to relax, which produces a lighter, shorter pastry for a good tart base.

Heat the oven to 180C/160C fan/350F/gas 4 and grease the base and sides of a 20-23cm tart tin.

If you have made gluten-free pastry, it might be necessary to knead it very lightly before rolling out. Roll out the pastry to about the thickness of a £1 coin and lift it carefully round your rolling pin and into the greased tart tin carefully pushing the pastry into and up the sides of the tin. Prick the base all over with a fork and return to the refrigerator for another 20 minutes to harden.

Line the pastry case with scrunched-up greaseproof or baking paper, fill it with ceramic or glass baking beans (use dry rice, beans, pasta or lentils if you have no baking beans) and bake in the oven for 15-20 minutes. Remove the baking beans, brush the beaten second egg over the base and return to the oven for 3 minutes or until the base is golden and the sides set. Reduce the oven temperature to 170C/150 fan/325F/gas 3.

Meanwhile, make the filling. Beat together the condensed or evaporated milk and the sugar together in a bowl with a hand-held mixer or in a stand mixer until the mixture is light and fluffy. This may take up to 20 minutes. Fold in the rest of the beaten egg, if using and pour the mixture into the pre-cooked pastry base and bake for 15 minutes or until risen and the surface is tacky. The tart is ready when there is a slight film over the surface.

Remove the tart from the oven and leave to cool and set before serving. Any leftover tart may be covered over and stored in the refrigerator. Eat within a couple of days.

COOK’S NOTES:

When making the pastry base, you may substitute caster sugar for icing sugar or you may omit the sugar completely for a slightly less sweet tart.

If you want a deeper tart, use a deeper 20cm tart tin rather than a 23cm regular tart tin.

Serve your tart on its own, sprinkled with a little sifted icing sugar or any cream of your choice perhaps with a little citrus zing of finely-grated lemon or lime zest which will help to cut through the sweetness.

One-Time
Monthly
Yearly

Make a one-time donation

Make a monthly donation

Make a yearly donation

Choose an amount

£3.00
£9.00
£60.00
£3.00
£9.00
£60.00
£3.00
£9.00
£60.00

Or enter a custom amount

£

Your contribution is appreciated.

Your contribution is appreciated.

Your contribution is appreciated.

DonateDonate monthlyDonate yearly

DAMPER BREAD WITH SEEDS

17 Sunday May 2020

Posted by catherineevans63 in Food and Drink, Uncategorized

≈ 3 Comments

Tags

Aussie Damper Bread, Australian, Baked, Damper, Damper Bread, Food, Healthy, Recipe, Seeded bread mix, Soda bread, Spelt bread, traditional

Damper Bread with Seeds

During Lockdown2020 it has often been quite difficult to source strong bread flour and yeast, due to people’s renewed interest in baking when long days at home are often focused on finding things to do with the kids or perhaps to perform a good deed for an elderly or self-isolating neighbour who cannot get to the shops and deserves a tasty treat. Even bread itself has sometimes been in short supply. When shelves are empty of ingredients and you need bread, what can you do? Making bread with all-purpose (plain flour) with added baking powder or, alternatively, by using self-raising flour mixed with water, a little salt and one or two extra ingredients if you like – whatever you fancy and have in the store cupboard – can produce a wonderful bread with delicious results.

Damper bread, or damper, is one of my favourite soda breads to eat. It is quick and simple to make, fuss-free with no ‘proving’ of the dough and very versatile. You can add whatever extra ingredients you like to vary the taste each time you make it; chopped olives or sundried tomatoes, herbs, seeds, a teaspoon or two of turmeric powder, walnuts, dates, finely chopped onions, even dried mixed fruit, the choice is yours. In this recipe, I have chosen to use mixed seeds from a health food store and I am using light spelt flour as it is lower in gluten and has a wonderful nutty flavour.

Traditionally a wheat-based bread, damper originates from Australia, when it was first prepared by the early settlers – swagmen, drovers, stockmen and a variety of other travellers – and cooked in the ashes of a campfire or in a camp oven in the outback. Back then it was a staple part of their diet. The early settlers travelled in remote areas for long periods of time and had with them only basic rations comprising flour, sugar and tea supplemented by whatever meat was available. The basic ingredients of a damper bread were flour, water and sometimes milk, and baking soda could be added for leavening. The damper was then cooked in the embers of the campfire. The ashes were flattened and the damper was placed on them and cooked for about 10 minutes. The bread was then covered with ashes and cooked for another 20 or 30 minutes or until it sounded hollow when tapped on the base. The damper could also be cooked in a greased camp oven instead, but in any case it was usually eaten with dried or cooked meat or golden syrup.

Today, damper still remains a popular Australian dish and might be served at a special occasion such as Australia Day. The basic recipe remains much the same but will sometimes contain melted butter. Damper is also popular in New Zealand and South Africa, where it is cooked on a barbecue and perhaps served alongside a meaty braai, for example.

As a young child I lived in Zambia in Southern Africa in the late 1960s/early 1970s and when I was 6 years old learned to cook over an open fire and fire, be it campfire or barbecue, is still one of my favourite cooking methods. It is possible to cook almost anything in this way and indeed I do when the weather is kind!

Preparation time: 30 minutes
Cook: 30-35 minutes
Serves 8

INGREDIENTS

450g all-purpose (plain) flour – you can also use plain spelt or wholemeal flour.
3 tsp (1 tbsp) baking powder – I used Dr Oetker
1 tsp fine sea salt
8 fl oz lukewarm water
1 tbsp Extra Virgin Olive Oil.

  1. Preheat your oven to 200C (Gas Mark 6).
  2. Meanwhile, in a large bowl, place the flour, salt and baking powder and stir together with a spoon or fork.
  3. In a jug, combine the olive oil and the water, make a well in the centre of the dried ingredients and pour in the oil and water.
  4. Add a handful or two of dried mixed seeds and stir in to incorporate. With clean hands, start to knead gently and bring the mixture together into a dough. Add a splash of extra water if necessary if the dough appears a bit dry.
  5. Turn the dough out on to a clean, floured board and knead the dough until it feels nice and smooth and shape it into a ball.
  6. Place the dough on an oiled baking sheet and mark out 8 segments with the handle of a wooden spoon. Bake in the oven for about 35 minutes.
  7. The bread is ready when you tap the underside and it sounds hollow. Leave on a wire rack to cool and enjoy with butter, some balsamic and olive oil, a little syrup or honey and/or as part of a more substantial meal.

Notes

Substitute self-raising flour for all-purpose if you prefer or do not have plain flour in the store cupboard but do not add baking powder.

Instead of adding seeds, why not try finely chopped onion or bell pepper, chopped herbs or walnuts, chopped olives or sun dried tomatoes or perhaps some raisins?

Oven temperatures vary so check your bread after 30 minutes if it smells cooked or you have a ‘fast’ oven.

Enjoy!

CULLEN SKINK

18 Tuesday Apr 2017

Posted by catherineevans63 in Food and Drink

≈ Leave a comment

Tags

Aberdeenshire, Chowder, Coast, Cullen Skink, Fish, Fish Soup, Haddock, Milk, Moray, Ramsgate, Recipe, Scotland, Scottish, Scottish Soup, Smoked Haddock, Soup, traditional

20170307_173638
20170307_173742
20170307_173746
IMG_20170307_180717_588

Earlier last month, Dan and I attended the International Women’s Day lunch at The Ramsgate Tandoori, in aid of local MENCAP services. We were all invited to dress up in our national costume (I don’t have one) and bring along a dish to share.

The dish I chose to prepare was Cullen Skink, because my paternal grandmother was Scottish, and fish and vegetables in their many forms are also my favourite things to eat. Okay, it might have been more convenient to pop down to my local Waitrose and buy a tin of Baxters’ Cullen Skink but although it has a wonderful flavour, it is never quite the same as homemade.

Cullen Skink is a thick Scottish soup similar in look and consistency to a chowder but with a gutsier flavour. It usually comprises smoked haddock, potatoes and onions. Traditionally, a Cullen Skink uses finnan haddie, but one may use any other undyed smoked haddock – and let’s face it, if you live south of the border, undyed smoked haddock is probably the best and closest you are likely to get to the real thing. On no account should you used the bright orange-yellow dyed fish often found in the supermarket, as the ‘smoke’ and the flavour are artificial and bear no resemblance whatsoever to the real thing.

Finnan haddie is also known as Finnan haddock, Finnan, Finny Haddock or even Findrum speldings. It is cold-smoked haddock in accordance to a regional method of smoking in the north-east of Scotland, using green wood and peat. Its origin is not entirely certain. Some believe that the delicacy comes from the hamlet of Findon, or Finnan, near Aberdeen, whilst others insist that the name represents a distortion of the name of a village, Findhorn, which lies at the mouth of the River Findhorn in Moray (which today encompasses the Highlands and Aberdeenshire). This dispute is rooted in the 18th century but with little trace, as adherents refuse to acknowledge even a grain of possibility of the alternative view. An early 20th century cookbook gives testimony to a fire in a fish-curing house in Portlethen, very close to Findon. Whatever the truth, Finnan haddie may have been a popular Aberdeenshire dish since the 1640s.

However, despite its popularity in Scotland, the dish took much longer to catch on south of the border and only caught on in London during the 1830s. In the old days, due to the light smoking of the fish, it only had a short shelf life of between one and three days. Therefore, although the fish might travel from boat to the Aberdeen table within 12 hours of being caught, the distance to London made it almost impossible to avoid the fish spoiling and so began its debut in London only once it could be shipped by mail coach and then more widely available once the railway link between Aberdeen and London was constructed in the 1840s.

The authentic preparation of Finnan haddie is to roast or grill whole pieces of fish over high heat, but it is often served for breakfast lightly poached in milk until just opaque. It is also an important ingredient of kedgeree and omelette Arnold Bennett, as served at the Wolesley in Piccadilly.

Cullen Skink is a popular starter at formal Scottish dinners – which perhaps might be complete with tartan, bagpipes and haggis and more than a few ‘wee drams’. The dish is a popular everyday meal across the northeast of Scotland but can also easily be found in some of the Edinburgh eating houses and pub restaurants. A few years ago, my friend Lorraine and I travelled to Edinburgh on a family history research expedition, and on our last evening we dined on a wonderful Cullen Skink followed by a calorie-busting Cranachan.

Like many local recipes, there can be several slight variations. Some cooks use milk instead of water and others add single cream. Traditionally, Cullen Skink is served with a good bread, but it can be eaten just as it is; at the March event we ate ours with curry!

Curiously, the word ‘skink’ derives from the Middle Dutch ‘schenke’ meaning ‘shin, hough, knuckle’ Over time, of course, the word has developed the secondary meaning of a soup, especially one containing meat – although there is no meat in a Cullen Skink, only fish!

I locally sourced my undyed smoked haddock from Cannons fishmongers on Ramsgate Harbour. The family have two boats and have been in the fishing trade since 1887 and their produce is always fresh, of high quality and very reasonably priced. Their cod and haddock cut through like butter and are easy to skin. The piece of haddock I used in my recipe cost around £9 for well over a pound in weight. If you don’t like skinning and boning haddock then ask your fishmonger to do it, but I undertook all preparation myself. Mine is a lower fat version of the original.

INGREDIENTS

  • 500g fillet natural smoked haddock, skinned and boned
  • 500ml semi-skimmed milk
  • A few peppercorns
  • Small knob of butter
  • 2 leeks, finely chopped
  • 2 onions, finely chopped
  • 3 cloves of garlic, crushed
  • 700ml vegetable or fish stock
  • 3 large white potatoes, cubed
  • Splash of dry white wine (optional)
  • Bay leaf
  • Sea salt and freshly ground pepper to taste
  • Squeeze of lemon
  • Good handful of fresh parsley, finely chopped
  • 2 spring onions (scallions) or chives, finely chopped


  1. Place the smoked haddock in a large pan with the milk and the peppercorns and lightly poach over a low heat until just opaque. Carefully remove haddock and set aside, also retaining the poaching juices.
  2. In a separate large pan, heat the knob of butter taking care not to burn it and add the diced potatoes and the onions and leeks and cook until softened. This is best done over a low heat and a piece of tin foil placed directly on top of the vegetables, allowing them to sweat rather than colour and prevent any charred bits.
  3. Add the garlic right at the end and stir for a moment or two and then add the stock, the reserved milk, bay leaf, wine (if using) and chicken stock, bring to the boil and then simmer for about 10 minutes or until the vegetables are tender. Remove the bay leaf and then season the soup with salt and freshly ground pepper to taste. Stir through and set aside. You may, if you wish, put the soup through a blender and then through a sieve to thicken before returning to the pan but I keep mine rustic! Some of the liquids will have reduced down in the cooking process so the soup shouldn’t be very runny. If the soup is a little runny and you don’t have a blender, simply mix a tablespoon of cornflour with a drop of milk and stir it through the soup over a low heat, to thicken. Add the cornflour mixture little by little until the soup has the consistency you require.
  4. Meanwhile, carefully skin and flake the fish, removing any bones, and season with lemon juice. Finely chop the parsley and the spring onions or chives.
  5. Add the fish to the soup pan, return to the heat and reheat for a few minutes until piping hot. Sprinkle over the parsley and spring onions or chives and serve immediately with some good soda bread or sourdough.

OPTIONS:

You could if you wish lightly poach a few free-range eggs or quails’ eggs and lay one atop each bowlful of soup, to serve.

If poaching and skinning haddock feels like too much of a chore, try using ready-cooked kipper or smoked mackerel fillets but do try to remove the skin and any visible bones before flaking. It’s not authentic but will still be delicious.


As for the fundraising event, it was a great success and we raised £500 for local MENCAP services!

Catherine.


One-Time
Monthly
Yearly

Make a one-time donation

Make a monthly donation

Make a yearly donation

Choose an amount

£3.00
£9.00
£60.00
£3.00
£9.00
£60.00
£3.00
£9.00
£60.00

Or enter a custom amount

£

Your contribution is appreciated.

Your contribution is appreciated.

Your contribution is appreciated.

DonateDonate monthlyDonate yearly

HELEN’S SEEDED BREAD MIX

17 Monday Oct 2016

Posted by catherineevans63 in Food and Drink, Uncategorized

≈ Leave a comment

Tags

Bread mix, Coeliac, FoodByHelen, Gluten-free, Gluten-free bread, Health foods, Healthy, Helen's Foods, Irish, Linseed, Natural, Seeded bread mix, Seeded loaf, Soda bread, traditional

Front of pack
Front of pack
Rear of pack
Rear of pack
Add milk, egg, oil
Add milk, egg, oil
Mix everything together
The batter is ready
The batter is ready
Pour into tin and mark with knife
Leave the loaf to cool
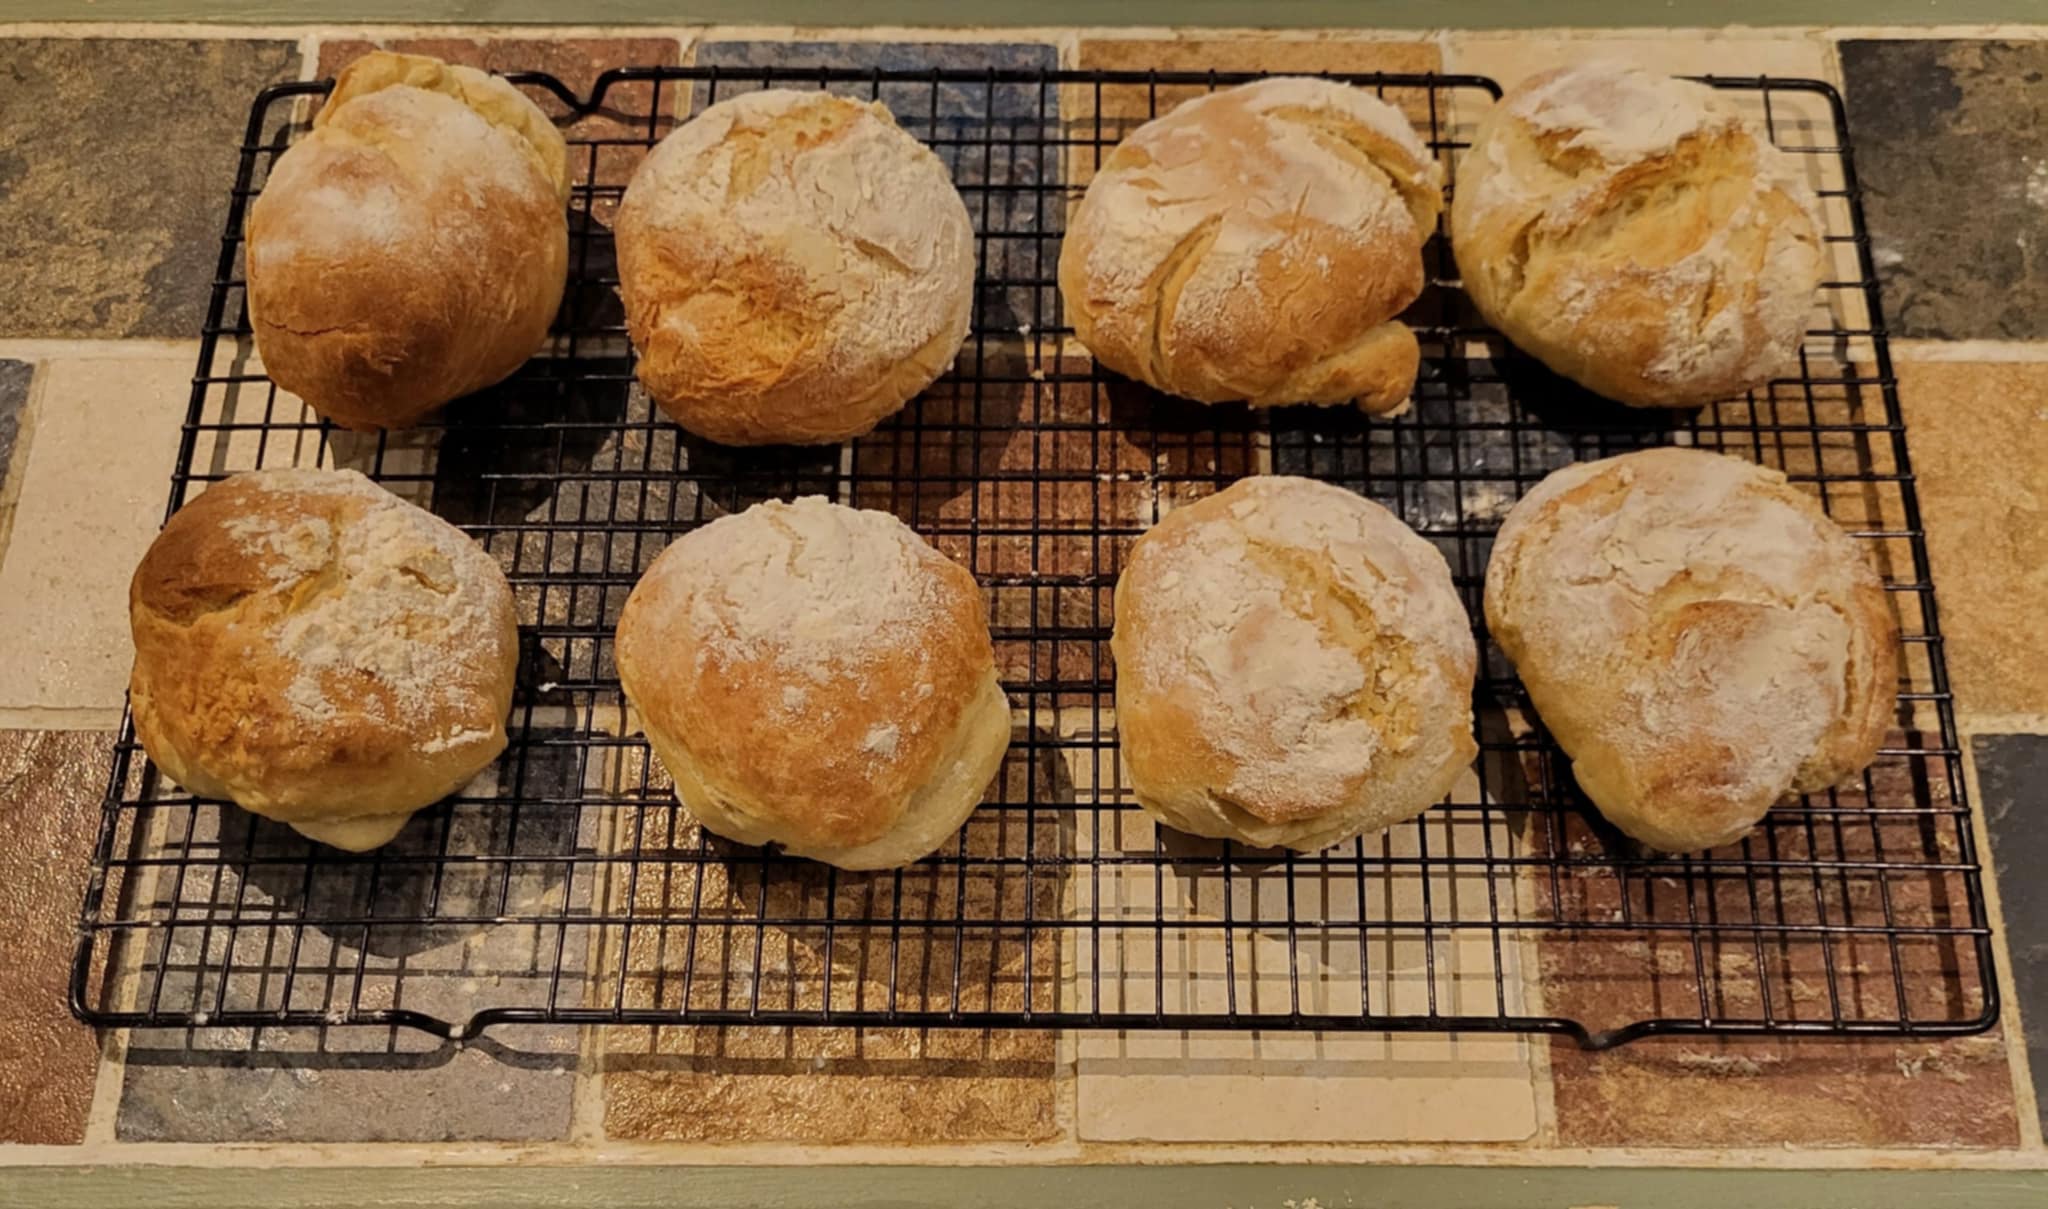
Ready to eat
Ready to eat

Last weekend, I placed my online order with ASDA and, whilst browsing the impressive array of groceries in the gluten-free ‘aisles’, I caught sight of Helen’s Gluten Free Seeded Bread Mix for £2.45. Curious to test it out, I added it to my order.

The Seeded Bread is one of three available bread mixes – the others being Sandwich and Brown Bread – and, like the other products in the range, are gluten- and wheat-free.

The price of a gluten-free loaf has come down considerably in the last year or two, but not all are appetising. My favourites to-date have been Genius and Marks & Spencer, although the Asda loaf isn’t bad either. Some of them though have a strange, dry cardboard/powdery texture, unpleasant to my taste buds.

Helen’s Seeded Bread Mix weighs 300g net and will produce a 550g loaf, so at £2.45 is still reasonably priced for a brand name. The mixes are produced by Virginia Health Food Ltd, Carrigaline, County Cork, Eire (Republic of Ireland, for anyone who doesn’t know).

Helen, it should be noted, is a real person, not a marketing ploy. According to her website, Helen O’Dowd was raised on a farm and is a qualified nutritionist, food scientist and mum. Her product is based on a fundamental belief that a diet and lifestyle based on natural produce is paramount in maintaining one’s health and wellbeing and, as a busy working mum, she recognises how difficult it can be to make sure that the whole family receives the right balance of nutrients each day.

The Helen’s products are made using linseed, or flaxseed, because it contains ancient gut-soothing properties commonly found in traditional medicine for thousands of years. The linseed is made even more precious by combining its ancient properties with modern cold-milling technology, which enable the highly functional nutrients within the seed to be more readily absorbed.

The front and back of the bread mix packet are colourful and informative and the packet itself is composed of a wax paper-type plastic that is recyclable as mixed plastics. The bread mix is also yeast free, making it suitable for anyone with a yeast intolerance, and is high in fibre. The packet claims the mix is “ready to bake in 2 minutes” but by the time I had gathered together and mixed all the ingredients and poured the mixture into the loaf tin, it was nearer five.

The ingredients and nutrition information (based on a loaf containing buttermilk and butter) are also clearly listed on the back of the packet along with an image of Helen herself, which gives the product a more homely and familiar appeal. There is also a smartphone scan for recipe ideas. An average 100g slice will provide you with 262 calories, 9.3g fat (of which 1.5g are saturates), 31.8g carbohydrate (of which sugars are 3.0g), 7.5g fibre, 8.9g protein and 1.0g salt. The ingredients are: Potato starch, Rice flour, Linseed flour, Mixed Seeds 22% (Pumpkin seeds, sunflower seeds, linseed), Sugar, Raising Agents – Sodium bicarbonate, disodium diphosphate, sea salt, Stabiliser: Xanthan gum.

Helen professes to use “top quality, nutrient dense, wholesome ingredients so you won’t find any synthetic stabilisers, preservatives or flavourings in any Helen’s products.” Now this ethos certainly fits my own philosophy; I endeavour to steer clear from additives and use only natural ingredients as much as possible. Certainly, nearly all the listed ingredients are familiar to me, but what on earth is disodium diphosphate? If disodium diphosphate is indeed a natural additive, from what is it harvested and how is it produced?

According to Wikipedia, disodium pyrophosphate (sodium acid pyrophosphate) is an inorganic compound comprising sodium cations and pyrophosphate anion (whatever that is). It is a solid, white and water-soluble compound that helps to maintain acidity and supplement nutritional values with widespread use in the food industry. It is used in various grades as a leavening-agent in baking powders and combined with sodium bicarbonate releases carbon dioxide. Grades vary according to the speed of action required. In the United States, the compound is “generally regarded as safe” for use in the food industry. As well as its use in baked goods, it is used in tinned seafood to maintain colour and prevent purge during the canning process. It can be used in the curing of prepacked meats, converting sodium nitrate to nitrate and enabling the meat to hold more water; it is also used in hash browns and other potato products to prevent the potatoes from darkening. In baking powder, disodium pyrophosphate is often labelled as the additive E540. Well I never knew that . . . sounds a bit like a chemical to me! However, I should like to point out that this is only my opinion and I would be interested in hearing from Helen herself or anyone else ‘in the know’, who might enlighten me further.

The baking method for the seeded loaf is detailed clearly on the reverse of the packet. To make the loaf, simply add one beaten egg, 1 tablespoon of oil or melted butter and 260ml milk or buttermilk. Although this recipe is clearly not vegan, you could substitute soya or almond milk for the dairy and replace the egg with a tablespoon of vinegar (which also acts as a raising agent and stabiliser) if you can live with the disodium diphosphate and Xanthan gum (incidentally, chia seeds are a good alternative to Xanthan gum in recipes).

So on Friday evening I preheated the oven to 200C (400F/Gas Mark 6). I then greased my 2lb loaf tin with vegetable oil. As my tin isn’t non-stick, I oiled it really well. In a bowl I whisked one medium free-range egg and to it I added the milk and vegetable oil and the bread mix and gave everything a good stir. The recipe doesn’t state whether the egg should be medium or large but as I had only medium I hoped for the best. The mix was quite runny at first but I mixed it for two or three minutes it became smoother and thicker but was still on the loose side when I poured it into the tin. The mixture reached about one-third of the depth of the tin and in hindsight I could have used my ceramic loaf-tin-shaped dish but the recipe doesn’t state what size tin to use. In any case, while a 1lb loaf tin would produce a deeper loaf it is not likely that the cooking time would be much reduced, if at all, as a consequence.

I endeavoured to make a deep slit in the dough lengthways with a knife but as the batter was quite loose, the slit was not pronounced. I sprinkled some sesame seeds on top, as per the recipe, but if you have none available you could perhaps use a sprinkling of sunflower or pumpkin seeds or a handful of linseed. I popped the loaf tin on the middle shelf of the oven and after about 35 minutes, removed the loaf from the oven and tested it with a skewer and, although the loaf was a pleasant baked golden brown, the skewer did not come out completely clean so I returned it to the oven for a further 10 minutes so the cooking time of 40-45 minutes is accurate. Oven temperatures do vary though and had I baked the loaf in my last oven, which was hotter, even at the same temperature on the dial 30-35 minutes would have sufficed.

After a further 10 minutes, I removed the loaf and retested it; it was ready. Leaving the tin a few minutes’ to cool slightly before handling, I ran a knife blade around the edges of the loaf and shook it out on to a wire rack to cool completely.

The loaf had a pleasant, home baked aroma and was well-risen with a good, deep golden brown crust. It cut cleanly with a bread knife and I could clearly see a good quantity of seeds running through the crumb, which was nice and light – not heavy or leaden at all – and had a round, nutty flavour with none of that aforementioned unpleasant papery texture I had been apprehensive about. In fact, neither myself nor Dan would have realised it was gluten-free unless we had been told. We ate ours with local butter and a mixed salad for supper, but Helen recommends topping the bread with banana or jam for breakfast or perhaps spreading with hummus and guacamole and topping with tomato or some fresh basil as a lunchtime treat; the bread is also fantastic sliced thinly for gluten-free party nibbles. I would present these topped with a little smoked salmon and cream cheese with dill, or perhaps some homemade artichoke pate or a teaspoon or two of finely chopped roasted Mediterranean vegetables.

The real test of the bread would come on Saturday, when it was maybe 16 hours old. I was exhibiting my arts and crafts at the Kingston-on-Thames Yoga and Vegan Food Festival and took with me a sandwich made from two slices of the gluten-free loaf spread with Whole Earth crunchy peanut butter and I have to say it was still delicious and free from a papery texture. The last of the bread also toasted well for breakfast yesterday morning, so an excellent result!

Although I normally hand bake my own bread from scratch without any artificial additives, I would definitely use this bread mix again were I pressed for time purely because it tastes so good and I will probably order one in – perhaps the sandwich loaf mix to see what that is like.

In addition to the bread mixes, Helen’s fantastic range includes a Breakfast Protein Crunch Mix with Raspberries and Breakfast Seed Toppings with Goji berries (both of which I think might go well as a topping on organic porridge), Gluten Free Scone Mix, Gluten Free Chocolate Cupcake Mix, Gluten Free Dessert Crumble Mix and Gluten Free Pastry Mix, all designed to help make mealtimes and teatime treats as convenient and nutritious as possible. They are certainly useful products to keep in the storecupboard to use when one is pressed for time and needs to prepare something in a hurry, or for those of you who are not confident cooks as the recipe mixes contain clear step-by-step instructions to help you produce perfect results time after time.

Helen’s range is also ideal for those who suffer from gluten intolerance or sensitivity or from coeliac disease. Some people, such as myself, find that eating wheat can leave them feeling bloated and uncomfortable and can produce flatulence, acid reflux or even lethargy. I have had a wheat intolerance all my life ever since I was 3 months old, when my mother added rusk to my bottle which caused me to suffer a ruptured bowel; I am also sensitive to soya and sugars, including lactose so for me, it is wiser to follow a gluten-free or low gluten diet as far as possible; I seem to be able to tolerate spelt.

The main protein in wheat, gluten originates from the Latin word for ‘glue’. It provides bread dough with the elasticity to trap in air to give the bread its familiar open texture.

Coeliac disease, meanwhile, is a condition that affects the small intestine and causes a permanent immune reaction to ingested gluten. If coeliac disease is left untreated it can result in damage to the lining of the small bowel, causing lack of absorption of essential nutrients and the development of anaemia, osteoporosis and other medical conditions including chronic joint pain and arthritis. It is possible for coeliac disease to develop at any age, including in those who for most of their lives have always eaten products containing gluten. The only effective treatment for a coeliac is to completely avoid wheat and foods containing gluten.

Today, coeliac disease is being diagnosed more and more and although statistics indicate that 1 in 100 people suffer from the condition, it seems to be even more common in people of Irish descent – despite my estimated 45% European autosomal DNA, I do have some Scots-Irish heritage.

Now it has suddenly dawned on me that the fibromyalgia with which I have finally been diagnosed might actually be a symptom of coeliac disease, especially given my intolerance to wheat products and the like, and I am thinking that I might see my GP about taking the blood test (about the only blood test I haven’t actually been put through in the last few years for my endocrine system woes), if only for peace of mind. At least then I might know for sure with what I am dealing and what further adjustments to my lifestyle I may need to make in order to maintain optimum health and vitality.

Some spectators believe that dietary problems have been aggravated or even caused by the Chorleywood Method of producing bread for the mass market, compared to the more traditional, artisan-produced loaf.

The Chorleywood process (CBP) of mass-producing bread dough was developed in 1961 by the British Baking Industries Research Association in the village of Chorleywood, Hertfordshire. At the time, few wheat varieties in Britain were of sufficient quality to produce high-quality bread products, and the CBP allowed a much greater proportion of lower-protein domestic wheat grain in the flour. In 2009 some 80% of the bread in the United Kingdom was produced by this method. Instead of the older bulk fermentation process, the CBP is capable of using wheat containing lower protein and produces bread in a shorter time than more traditional methods, meaning that a loaf of bread can be produced from flour to sliced and packaged in around three-and-a-half hours. Quick-ripened bread dough is achieved by adding ascorbic acid (Vitamin C), fat, yeast, emulsifiers, enzymes and other artificial additives, followed by intense kneading by high-speed mechanical mixers for about 3 minutes. The argument is that the CBP can use wheat with a lower protein content because some protein is lost during the bulk fermentation of traditional bread, which does not happen to the same extent in factory-produced doughs. It can also be pointed out that CBP is simply a method of producing quick-ripened bread dough and that factory-based bread-making with mechanical processes has established since at least the 1860s.

The high-speed mixing in the CBP generates high temperatures in the bread dough, which is cooled in some advanced mixers using a cooling jacket. Sometimes chilled water or ice is used to counteract the rise in temperature during the mixing process. Air pressure in the mixer headspace can be managed to ensure gas bubbles retain the desired size and number. Operating regimes consist of pressure followed by vacuum, and atmospheric followed by vacuum. Pressure control during the mixing process will affect the texture of the crumb in the end product.

In high-volume bread production, the dough is cut into individual pieces and left to “recover” for between 5 and 8 minutes (intermediate proving) and then each piece is shaped or moulded, placed in a baking tin and moved to the humidity- and temperature-controlled proving chamber, for 45-50 minutes. The dough is then baked for 17-25 minutes at 230oC. The loaves are then removed, or de-panned, from the baking tins and sent to the cooler for about two hours, after which they are sliced and packaged ready for dispatch to shops and supermarkets. In the United Kingdom, the dough piece is ‘cross-panned’ during moulding, whereby the dough piece is cut into four and each piece turned by 90o before being placed in the baking tin. This enables the bread to have a finer and whiter crumb texture and slices easier.

A far cry from the lovingly handcrafted, artisan-produced loaf!

Most of Helen’s products – except for the Golden Linseed Crunch and Linseed Crunch with Cranberry and Almond – are Coeliac UK Crossed Grain approved. To read more about Helen O’Dowd and the products she offers, to view recipes and videos, find stockists or to order online, do visit her website: http://www.foodbyhelen.com


Catherine.


Donate with PayPal

Blog at WordPress.com.

Privacy & Cookies: This site uses cookies. By continuing to use this website, you agree to their use.
To find out more, including how to control cookies, see here: Cookie Policy
  • Subscribe Subscribed
    • Catherine Evans
    • Join 42 other subscribers
    • Already have a WordPress.com account? Log in now.
    • Catherine Evans
    • Subscribe Subscribed
    • Sign up
    • Log in
    • Report this content
    • View site in Reader
    • Manage subscriptions
    • Collapse this bar
 

Loading Comments...